Want to stay in touch? Become a 'Golden Ticket Member' (for FREE) for exclusive discounts + sales + freebies + news. Yes, please!
Showing posts with label Friday thoughts. Show all posts

Friday, 2 August 2013

Friday Thoughts - Celebrating Firsts

I have had some new little ones join our group this term. It will be the last time that new little ones will join our group. It makes you appreciate how far the older children have travelled and grown since the beginning of the year. It also makes you appreciate how big this event is - starting a new place for the first time. It's such a milestone...

To celebrate this, I thought that I would devise a special certificate to commemorate this event. I took a photo of each of the little ones on their first day and embedded it into this certificate. I printed this out (using my colour printer to add colour) and laminated it. This certificate could then be added to fridges or photo albums at home. This is the certificate that I devised...

This idea could be used for children in your own family by creating a special certificate or page. A photo of the child on their first day of school or kindergarten could be added, as well as the place, teacher and date of the first day. You could quiz the child about their favourite moments of the day and add this special journaling to the page.

Thanks for viewing!

Friday, 28 June 2013

Friday Thoughts - Treasure Bag Card

A special, little friend of mine has just turned two. I thought that I would make her a unique and glittery card to go with her present. You can make one as well, and don't just limit yourself to the number two. You could have any number that you like on the front or use a simple shape outline (eg. heart or star).

What you need: card, pencil, tracing paper (or baking paper), scissors/cutter, paper for insert, small snaplock bag, various 'treasures' (sequins, paper punchies, glitter), sticky tape, eraser.

Measure out, cut and fold the card to the desired size.

Find a desired image. I used a computer to generate my number. Just ensure that the image will fit on the front of the card. Also ensure that the snaplock bag is bigger than the image.

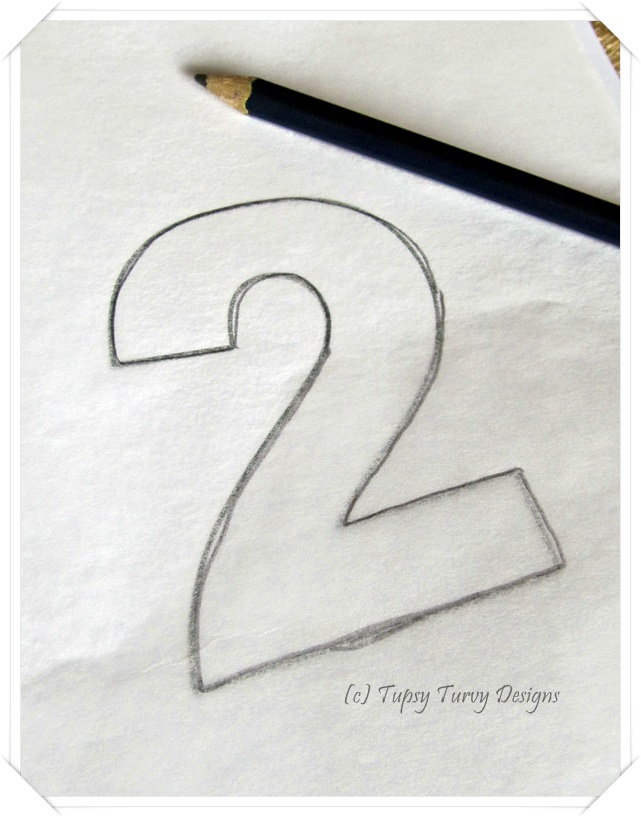
Using the tracing paper and pencil, trace the image. I simply use baking paper - it is handy (I usually have a stash in the pantry) and it is just as effective.

To transfer the traced image onto the card, flip it over (right side facing down) and scribble over the lines with the pencil. Flip over again (right way facing up), place onto the front of the card and trace over the lines of the image.

This is what my image looked like.


Using scissors or cutting tool, carefully cut along the lines of the image. With an eraser, rub out any remaining pencil marks.


Fill the snaplock bag with a variety of 'treasures', making sure that the bag is not too full. Seal the bag.

Tape the bag to the inside of the card - over the hole left by the cut out image. Tape along all the edges.

Make an insert with the paper to be placed in the card. Choose a colour that is evident in your 'treasures' (I chose purple). Not only will it cover the bag on the inside of the card, but I personally think that an insert finishes off a card. Simply fold the paper and trim it a few millimetres smaller than the card. I also use scissors that have a fancy edge/style to cut the side of the insert (see photo for reference). The trick with inserts is to adhere one side only, not both, to the card, otherwise the insert bulges when closed. Hence, place adhesive only on the side that will cover the taped bag (using the photo as a reference, I placed adhesive on the side that can be seen in the above photo). Place the fold of the insert into the fold of the inside of the card (as per the photo) and carefully close the card to adhere the insert to the inside of the card.

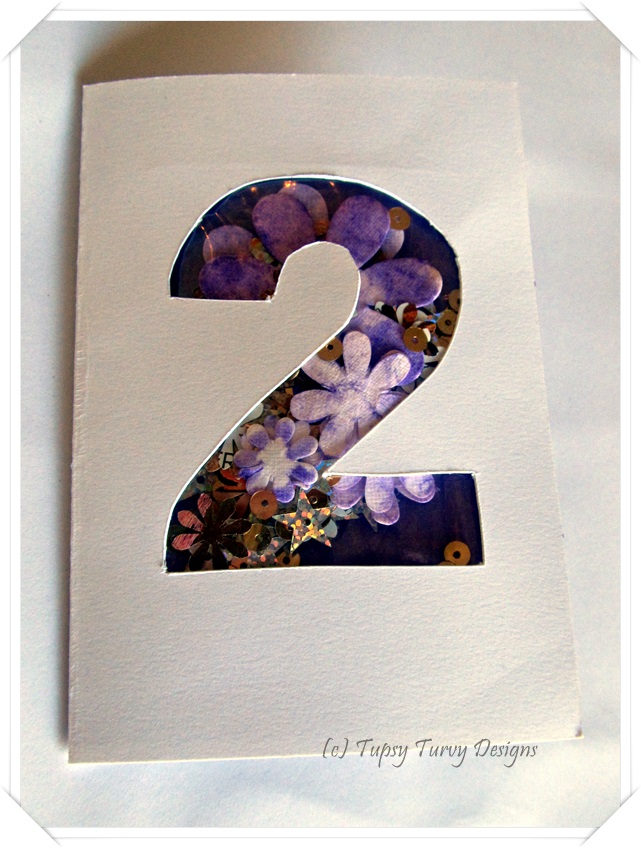
The finished card...

Have a wonderful weekend!

Friday, 21 June 2013

Friday Thoughts - Flower Gift Tag

Receiving a present is a lovely surprise. The way a gift is wrapped can enhance the gift that is given. Paper and ribbon can assist in this and so can gift tags. Here is a design for a floral tag with a touch of bling...


What is needed:
 card for the base, a matching floral paper for the top of the tag, flower hole punch, ruler, pencil, adhesive, scissors/paper trimmer, circular hole punch, ribbon and diamonte embellishments.


Cut two identical rectangles, one out of the base card and the other out of the floral paper. I made my rectangles 8cm x 6cm.


Using the floral punch, punch out three flower shapes - top and bottom on one side and from the middle on the other side.


 Keep the floral shapes that are produced.


 Using the adhesive, glue the top floral rectangle onto the base rectangle.


 Turn the tag over so that the base is facing up. Cut one of the corners and flip it over onto the other side and trace with the pencil (see above). Cut along pencil line. This will ensure that the tag looks balanced.


Turn the tag over so that the floral side is facing up. Punch a hole at the top of the tag with the circular punch (see above photo for reference). Add diamonte embellishments in the middle of punched flowers. Tie a length of ribbon through the circular hole.

Turn the tag over and adhere the three punched flower shapes to the bottom left tag.

Write a message on the back of the tag and your tag is ready to attach to your gift.

Friday, 14 June 2013

Friday Thoughts - A Hanging Heart

A lovely little heart that could be used to decorate a small, plain place or strung through a parcel ribbon to decorate a gift. A large amount of duplicates could be tied to a ribbon to make a simple bunting or they could be used to decorate a tree. So many ideas...


Materials:
  • A cardboard tube
  • Paint and painting tools
  • Hole punch
  • Jute twine
  • Ribbon
Steps:


Cut the cardboard tube into 'slices'. I divided my cardboard tube into thirds, however, you may wish to make the 'slices' thinner. Mine ended up being approximately 2cm in width.


Gently press one edge of each cardboard tube between your thumb and forefinger to make the tube into a teardrop shape.


 On the opposite side of the point of the teardrop, gently press the tube into the centre to make the top part of the heart.


 Repeat for the other cardboard tube 'slices'.


 Paint the hearts. I place the wet hearts on baking paper so they don't stick. Allow to dry.


 My hole punch could slide on to the 'valley' of the top of the heart. I punched a hole in the centre. Punch a hole at the base of the heart. Measure around 30cms of twine and thread through the holes so that there is approximately 6cms out the bottom of the heart. Tie a knot in the twine above the heart. Gently pull the twine at the base of the heart to increase the heart shape at the top. Tie a knot in the twine at the base of the heart.


 Loop the twine at the top of the heart and knot. Measure a length of ribbon and tie a bow around the twine at the top of the heart. Other decorations could be added - beads, punched shapes, glitter ... or just keep it like this.

Ready to share some love...

Friday, 24 May 2013

Friday Thoughts - Crafty Caterpillar Tutorial


Caterpillars have been on my mind due to reading Eric Carle's book, 'The Very Hungry Caterpillar". I made up a crafty cardboard tube caterpillar for children to make out of items that are found around the home. Older children could possibly make this by themselves, however, younger children will need assistance.

What is needed: two or more cardboard tubes (approximately 10cm in length), ribbon/cord/twine, hole punch, paper, card, tape, rubber band, cotton tip/chenille stick/'pipe-cleaner', paint/markers/stickers, scissors, glue or double sided tape.

 Cut the rolls into thirds. The more rolls that are used, the longer the caterpillar. Paint the pieces if desired and leave to dry. I decided to leave mine their natural colour.

Using the hole punch, punch a hole at each end of each piece of tube. Do the same on the opposite side of each piece.

Using small lengths of ribbon or cord or twine, tie each piece together on both sides of the pieces, linking all the pieces up.

Cut little rectangles out of card or other desired 'leg' shapes.

Stick the 'legs' on the bottom of the body pieces using double sided tape or glue.

Draw/trace a circle on the paper a little larger than the end of a tube. Cut it out and draw a face on it. Fold it over the end and secure it with a small rubber band.

Tape down the edge of the face to the cardboard tube and remove the rubber band. Bend a cotton tip or chenille stick/'pipe-cleaner' and tape it down on top of the head for the antennae. Using markers or stickers, decorate the body of the caterpillar.

This caterpillar bends a little, just like a real caterpillar, if the ribbon/cord/twine is not pulled too tightly.

Have fun!

Friday, 26 April 2013

Friday Thoughts - Craft Abroad

It has been a while since I have posted on here...

...what with a busy end of school term and a trip overseas, it has been a little challenging to find some time to sit down, relax and blog. However, I am back and can't wait to get back into the blogging routine.

It has been great to experience another culture and way of life for a short time, which also instills an appreciation of some of the things that I take for granted. We stayed with a family that was so welcoming and hospitable, indeed we were very spoilt. Upon leaving, we were given some gifts. I thought that I would share some of these crafty items...

This is a cloth bag that has been embellished with beading - on the corners and on a strip around the bag. The shoulder strap is also beaded.

Here are a couple of beaded ornaments comprising of a beaded 'net' over the ball and strands of beads hanging from the ball.

I brought along my crochet to work on the plane and whilst away. One local, young lady was very intrigued when I was working on it one day. She stood there for a while and watched while I crocheted away. I suppose knitted fabric and wool aren't common place in this country.

Have a lovely weekend!

Friday, 22 March 2013

Friday Thoughts - Thinking about Easter

We are about to enter the week leading up to Easter. For me, it feels as if time has ticked around very quickly, however the forty days of Lent (not including Sundays) is almost finished for another year.

As the supermarket shelves are bursting with chocolate goodies in preparation for Easter, it is also important to contemplate why this celebration occurs.

My husband wears a cross like this nearly everyday and attracts the occasional comment. The cross that he wears, he made in his teenage years. The cross is a poignant symbol of Easter, reminding of the brutal death of Christ. The horse shoe nails that make up the body of this cross pendant are a stark reminder of the nails that were used.

Other symbols of Easter, focusing on the 'new life' aspect of Easter include eggs, butterflies, chicks, flowers, rabbits (and other Spring items). There are lots of beautiful handmade items around at the moment that incorporate these symbols to either give as gifts or to decorate homes/Easter feasts. Madeit's Easter gift guide has a selection of these items. Click here if you wish to view this guide.Do you make any handmade items to celebrate Easter?

Have a lovely weekend!

Friday, 15 March 2013

Friday Thoughts - Mapping for young children


At times, we can take maps and directions for granted. When you stop and think about it, being able to follow a map or give directions are quite important skills. They are also quite difficult concepts as maps show a 'bird's eye' view of an area, and when giving directions, you need to verbalise the map that appears in your head of how to find a certain place.

Can young children undertake such complex thinking? Absolutely...and in a fun way. The idea is to make it relevant to them and begin with concrete materials. I tried this out with the children that I work with a couple of weeks ago and they loved this activity...

I encouraged the children to think about their own bedroom. We made a list of all the furniture that is situated in their bedroom (eg. bed, drawers, wardrobe, toy box, etc). I then gave each child an ice cream container lid (a placemat or board would work just as well) and a ball of playdough (there are various recipes that are on the web and it is easy to make). I then encouraged the children to make their bedroom furniture with the playdough and show me where it is in their room by placing it on the lid, pretending that the edges of the lid represent the walls of their room. Once they completed the playdough model of their room, I took a photo of their model from the top (from a 'bird's eye' perspective). The next lesson I had a square on a piece of paper and some smaller labelled rectangles and squares to represent various pieces of furniture. Using the photo as a guide, the children cut out the 'furniture' and glued it on the square to show a map of their bedroom.

I think if I skipped the playdough model step, developing a map of their bedroom would have been much more difficult for children. This same model and mapping idea could be also used to map a yard, a classroom, a playground or any other familiar place.

Have a wonderful weekend!

Friday, 22 February 2013

Friday Thoughts - Thank you!

There is a lot to be thankful for...

...Every day people show courtesy and respect to us. Then there are those lovely people that go out of their way to help us out - looking after the children, giving us a meal, doing a favour...

We can show our gratitude to others in numerous ways as well - returning the favour, giving them a gift, a bunch of flowers, a box of chocolates, baking them a cake...

Recently, a friend of mine helped me out in a remarkable and selfless way. I couldn't let this act of kindness slide by, therefore I needed to create something. I tried a new card design, which I loved making...

(I also made one for my brother's birthday). The 'pop-up' idea is based on a design by 'Julie Munoz', however I have added my own spin to it :)


I also made up a rose brooch that could be pinned onto clothing or a scarf. Simple but sweet. I love this design (and colour) and will definitely make up more.

Handmade goodies are a great way to say 'thank you' to someone. Returning the love that someone has shown to you in every stitch!

Thanks for viewing and have a great weekend!

Friday, 15 February 2013

Friday Thoughts - Colour


Every week, I look forward to a particular time at work. It is when we focus on creativity and art skills. As a creative person, I enjoy teaching and fostering art and craft skills in young children.
Over the past few weeks, we have been focusing on the topic of 'Colour'. The children have identified colours and objects that are particular colours. The children have experimented with mixing colours, firstly with paints and then with cellophane. I didn't 'teach' the children that certain colours mixed together make a new colour, rather, I let them find it out for themselves and then got them to share their 'combinations' with others to try. The difference is amazing as children get so excited when they discover colours for themselves. This enthusiasm continues to drive their learning and gives them a sense of self achievement.

After discovering colour combinations with paint, we then transferred our knowledge of colours to cellophane. The beauty of cellophane is that it is transparent. I cut up pieces of red, yellow and blue cellophane. I also gave the students a clear, plastic pocket (pockets that hold paper documents in folders). Students stuck down pieces of cellophane on top of the clear pocket with sticky tape. I encouraged over-lapping of cellophane pieces so that when the finished art piece is stuck to a window, the over-lapping shows new colour combinations. Stick these colourful art pieces to a window to allow the colour combinations to be evident.

Have a wonderful weekend!
Friday, 8 February 2013

Friday Thoughts - Family

I am slowly beginning to get to know the little ones that I am working with this year, their likes, their skills, their personalities and about their famiies.

Currently we are learning about our families. Even though this topic is perceived as basic curriculum or knowledge for little ones -  for children to state the members of their families -  it can be quite complex for some children. Sensitivity and an awareness of this complexity is a must, as this topic could trigger off a range of emotions inside these little souls. Feelings such as anger, sadness, grief and confusion may arise as these children realise that their family is 'different' to others.

However, despite this, children need assurance that even though there are differences between families, these differences are OK and that families are places of love, safety, support and care. I emphasise that the children in my care are valued, that I care about their learning and I try to ensure as much routine as possible to provide stability.

Despite the cautions, learning about families can be fun. Here are a few ideas...
  • Paint a family portrait.
  • Labelling copies of family photographs, identifying different family members.
  • Browse through baby albums of the child and their siblings.
  • Look at photos of celebratory and happy family events. Talk about why this was such a joyful event, maybe write a recount of this event.
  • Make pop stick puppets of family members - drawing pictures of family members on small pieces of card and taping pop sticks on the back.
  • Find where different family members live on a map.
  • Write letters to family members that live in different towns/cities.
Have a wonderful weekend!

Friday, 1 February 2013

Friday Thoughts - What's my name?

It has been wonderful getting to know a new set of little ones at work. They're eager to learn, eager to play and eager to have fun. One of the first skills that I encourage these little ones to learn is to recognise and write their name. For those children that have a short name, this skill is quickly learnt, however, those children that have longer names, it can be quite tough. Practice can be as simple as copying their own name onto some work that they have completed, however, I have found some fun ideas that can assist in name writing and recognition...

Make a puzzle using the letters of the child's name (by Happy Hooligans)

Making their name out of playdough (by Kindergarten Rocks)

Searching for letters game (by Teach Preschool)

Other ideas include:
  • Use game pieces (eg. Scrabble letters) to make own name.
  • Use magnetic letters - the child can write their name on the fridge.
  • Find letters in magazines/newspapers and cut them out and stick them together on a piece of paper to make their name.
  • Tear little pieces of coloured paper and stick them down on paper to make their name.
  • Use pavement chalk and write their name on pathways.
  • If chalk gets too messy, simply give a paint brush and water and they can 'paint' their name on pathways.
Have a great weekend!

Friday, 25 January 2013

Friday Thoughts - Back to school


Well...they say that 'all good things must come to an end' and for me, it is back to work I go. It also means that a lot of little ones will be starting school again for a new year (or for the first time).

It is hard to get some children to eat, particularly healthy foods at the best of times, let alone in a school setting. Kelly, from 'Little Wonders' has some great ideas to add some colour to the lunch box to make food fun to eat. Some ideas include: finding colourful serviettes and utensils, sprinkles, notes (you could use jokes), surprise gifts (eg. stickers), miniature food and cutting sandwiches with cookie cutters. If you would like to find out more, click here.

Some other healthy lunch box ideas include:
  • Providing a salad instead of sandwiches - place a tub of pasta salad, rice salad or garden salad in the lunchbox.
  • Make wraps - use 'mountain bread', pita bread or make sandwich roll ups (sandwich sushi).
  • Make savoury muffins - often these can be frozen individually, to make it easier to pop one in the lunch box without a lot of fuss.
  • Veggie sticks and dip - hummus or bean.
All the best for littlies beginning the school year!

Friday, 18 January 2013

Friday Thoughts - A variety of uses

I love up-cycling t-shirts by cutting and stitching them into something else. So far I have moulded t-shirts into necklaces, rings, cushions and keyrings. The creation of something new made out of something that is no longer wanted. Not only practical, but good for the environment as often unwanted items are thrown away. These items are often 'one of a kind', unique and stylish in their own right. It has also made me be more aware of items that could be re-purposed or up-cycled.

Therefore, I thought that I would share something that I find quite handy... I use cutlery drainers as pencil holders for the children that I work with. The cutlery drainer is usually segmented which allows me to put pencils in one segment and crayons in another. Pencils, etc are able to easily accessed by the children and if the cutlery drainer has a handle, it makes it easy for children to pick up and carry (eg. from the shelf to the table). An idea if you have pencils or other writing implements that need a home.

Have a great weekend!