Want to stay in touch? Become a 'Golden Ticket Member' (for FREE) for exclusive discounts + sales + freebies + news. Yes, please!

Monday, 27 July 2015

Craft Tutorial - Mixed Media Popstick Puzzle


I love discovering different ways to use mixed media techniques to make pretty gift ideas. This one is especially for children...

Puzzles can be a wonderful learning tool to help children remember concepts, use their fine motor skills and help with spatial awareness. Making your own puzzle does not require expensive materials... in fact, most of these materials can be found around the house. This puzzle also requires popsticks, which are inexpensive and are readily available.  

I decided to make a puzzle that will help in recognizing numbers 1-5, but this puzzle could easily be extended up to 10 or further simply by adding more popsticks. Rather than numbers, a child's name could be used in order to help the child to recognise and spell their own name.


Materials:

* Popsticks - I used 10 popsticks in my puzzle, but any number could be used.
* Masking Tape - to hold the sticks together in the process of creation.
* Paints - White and other colours that you want to use. I used acrylic paint and chose a blue and yellow colour theme.
*Scissors
*Decoupage Glue (or you could possibly use PVA glue, thinned with water)
*Brush for the glue (a cotton bud could possibly work)
*Something to mix paint on (a plastic lid or plate would suffice)
* A permanent pen
*Paper - only need to be scrap paper. I used old book pages.
*Pencil
* Kitchen sponge and bubble wrap (optional) 
* Computer/printer or lettering stencil
*Craft knife and cutting mat


Step 1 - Line up the popsticks.


Step 2 - Place two lengths of masking tape over all the popsticks, one piece at the top and one piece on the bottom. This will stop the popsticks from moving when making the puzzle.


Step 3 - Turn the puzzle over (so that the tape is facing down) and paint the side facing up with white paint.


Step 4 - Once the white paint is dry, mix up a light hue of the main colour with some white and paint over the top. I chose blue.


Step 5 - Add a little more main colour to the light hue (to make it darker) and place a small amount on a kitchen sponge.


Step 6 - Sponge over the top of the popsticks, making sure some of the lightest hue is still showing. If you don't have a spare kitchen sponge, use a brush, cotton wool ball or even your fingers.


Step 7 - Add more main colour to the mixed paint (to make it a little darker still) and place a small amount on the bumpy part of bubble wrap.


Step 8 - Print it over the popsticks, ensuring that the lightest hue and some of the kitchen sponging is still showing.


Step 9 - Using a computer or lettering stencil, create the main image that is desired on the puzzle. In my case, I needed large numbers from 1-5 and small number words.


Step 10 - Cut out the numbers (or letters) with the scissors.


Step 11 - Turn the numbers (or letters) over so that they look back to front and glue them onto the scrap paper using the decoupage glue. Paint a thin layer of decoupage glue over the top of the numbers as well. They will need to be back to front as the other side will be showing, the printed numbers will act like a stencil.


Step 12 - Once dry, carefully cut around the numbers or letters with the scissors...


... so when they are turned over, they look like this.


Step 13 - Position the numbers or letters on the popsticks and arrange accordingly. Once happy with their positioning, adhere the numbers or letters to the popsticks with the decoupage glue. Paint a thin layer of glue over the top of the numbers or letters.


Step 14 - Once dry, paint over the letters or numbers with a layer of white paint, being careful to keep the white paint on the numbers/letters and not on the popstick background.


Step 15 - Once dry, paint over the numbers or letters with your chosen colour. I decided to add a little brightness, so I painted my numbers in yellow.


Step 16 - This is rather an optional step, however, I wanted to add the number 'words' to the puzzle. I typed up the words that I wanted on a computer and printed them out. I cut out the words with scissors and glued them down on the popsticks with the decoupage glue. I also placed a thin layer of decoupage glue on top of the words. You could do the same with any chosen words according to your puzzle theme.


Step 17 - Once dry, outline the numbers or letters and words with the permanent marker.


Step 18 - I needed to tie in the yellow that I used for the numbers with the popstick background, so I placed a little bit of yellow on my finger and smudged it in a few places on the popstick background. If a very different colour is used for the letters or numbers, you may wish to do the same.


Step 18 - Turn over the puzzle so that the plain wooden background is facing up. Take off  the masking tape and carefully move the craft knife between the popsticks to cut them apart. Turn each popstick over so that the painted side is facing up. For durability, paint a thin layer of decoupage glue over each individual popstick.
 

Once dry, the puzzle is all set to be put back together again.

These popstick puzzles would be an ideal gift as a stocking stuffer or to place in a handbag for a toy that could be pulled out to entertain a child when out and about.

I would love to see your popstick puzzle design and final product. Feel free to let me know!

~Jen.

Thursday, 16 July 2015

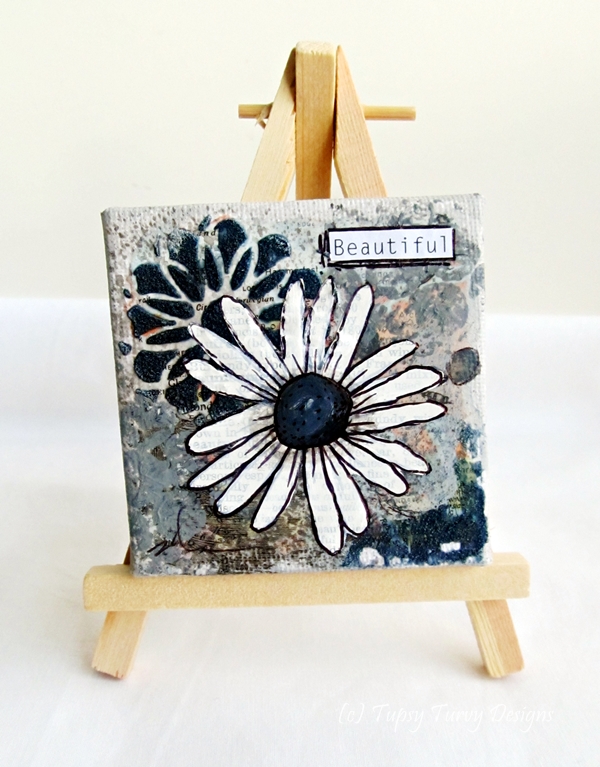
A white flower on a stormy, grey background {mixed media}

I love storms - the ferociousness and power of them, but I dislike being in the midst of them. In fact, to be brutally honest, I am quite a 'scaredy cat' when thunder rolls and claps nearby. I think it all stems from learning about weather in my teens. I had (and still do) a fascination with storms, tornadoes and clouds and read all about them from books from the library. From then on, I developed a healthy respect of the power or storms and the knowledge of what exactly lightning is and what strong winds can do.

It didn't help things when we had a powerful storm rip through my home area one Summer. I have never heard wind so loud before and the violence of the wind ended up bending TV antennas and uprooting some trees. This was coupled with pelting rain.


I would not have thought about this colour combination if it weren't for a custom order that I filled a little while ago. I fell in love with the stormy grey hues with the touch of navy blue. I knew that I wanted to create a set of flowers on tiny canvasses and the colour that I chose for the flower... white.


The next decision was working out words to place on these canvasses. The first word that I thought of was 'hope'. No matter what 'storms' are thrown at us, hope shines through, similar to the stark, white flower brightly blooming on the stormy, grey background.

I also thought about the word 'beautiful' - the purity and simplicity of the colour white being simply 'beautiful'. Words of encouragement and strength.

If you would like to view these canvasses in store, click here.

~Jen.

Friday, 19 June 2015

Paper mache - Little Babushka Dolls


Lately, I have had a fascination with paper mache, as I wanted a way that I can move my mixed media art from being two dimensional to three dimensional. I have been so inspired to give it a go that studied up on it. This is despite my knowledge that it could all get a little messy, be time consuming and could all be a waste of time in the end. However, I came up with a Babushka doll design - complete with the addition of fabric to highlight her headscarf. 

With this particular group of dolls I painted faces on, however I am unsure about this as I like my faceless ladies that I create on my canvases. I thought, to link to the two, this may be needed on my three dimensional art. In the next sense, I do like their cute little faces that makes each doll more individual. Do I necessarily need to link the two? I think I will also add some more of the black lines, squiggles,etc that I use in my mixed media art on my three dimensional art to add some more detail and spark to my dolls.

.
Overall, I am very happy with the result. I have a little group of rustic, simple, unique ornaments.Yes, they were a little messy to make, but they were fun to create and were not all that time consuming. I am just hoping that I have dried them enough so that they don't fall in a heap. I am giving them a little test to see how they go. If all is good, they will become a new line in store.

Of course, I can't stop at one! I also have more ideas in the pipeline for this type of art, including boats for boys and apples for teachers.

I would love to know what you think.
~ Jen.

Monday, 1 June 2015

New greeting cards - Lemon Yellow and Blue

Blue and yellow are one of my favourite colour combinations. To me, it evokes happiness, hence this colour combination is ideal for greeting cards. These cards are the newest out of the studio...


These cards are created using mixed media techniques (that include paint, texture work, fabric and drawing) that have been applied on collector cards. Every card is different and unique - no exact copies! Each card has a blank insert added, ready to add personal sentiments.

To view the range of cards that are currently in store, click here.

** Special Price: Choose any three cards in store for $12 **
To view more information about this special deal, click here.

~Jen.

Thursday, 14 May 2015

Behind the scenes - lemon yellow and aqua blue cards


These card features are currently on my studio table. They need 'rub ons' added to them and then they only need to be adhered to greeting cards. 

A card insert is finally added, to top each card off (as every Tupsy Turvy Designs card has an insert added).

If you wish to currently view cards that are currently in stock (and/or take advantage of our three greeting card discount), click here.

~Jen.

Thursday, 7 May 2015

Make your own party decorations - DIY Cupcake Topper Craft Tutorial

Special celebrations call for special surprises. Sometimes, special celebrations call for personalisation of decorations to match the person, their interests or their celebration. At times, purchasing decorations and celebratory items can get costly.


If you are looking for a simple decoration to pop on top of cupcakes or sweets, that will reflect the event or the special person, and will cost next to nothing (besides a little of your time), then this tutorial could be for you!


Items that you will need:
  • Water paints - borrow a water paint set from the children or add some water to acrylic paint to create your own water colour.
  • paint brush or cotton bud
  • scissors
  • pencil 
  • permanent marker
  • paper - I used an old book page, but anything that will allow water paint to be applied will suffice.
  • a coin - the size of the finished item or a circle hole punch (I used a 20c coin)
  • toothpicks or popsticks (if you want 12 cupcake toppers, you will need 12 toothpicks/popsticks
  • glue/glue stick (non-toxic as it will be near your cupcakes!)
Trace around the coin with the pencil. Repeat until you have the required amount. Keep space between them (at least the same size as the circle). I have left the space to the left of the circle. Alternatively, punch out twice the amount of circles from the paper (ie. if you wish to have 12 cupcake toppers, punch out 24).


Cut between the circles to separate them. Fold the spare space underneath the circle.


Holding the folded paper together, cut around the circle, hence creating two circles at once.


There should now be two paper circles for each finished cupcake topper.


Flip over the circles to make sure that any pencil is not seen. Using the paint brush or cotton bud and the water colour paints, paint over each circle your chosen colour(s), keeping in mind that two circles will be required for each topper, hence if you wish to have a green background for a topper, paint two circles green. Allow to dry.


Next, draw a chosen design in the middle of each circle with the permanent marker (try out your design on scrap paper first to ensure that you are happy with the look). I chose a simple leafy plant motif to be displayed on my cake toppers, but you could choose anything! Some suggestions include: a love heart, a number (the age of the special person if it is a birthday celebration, eg. '40' for a 40th birthday), a letter (the initial of the special person), a star, a happy face, etc.

To create the same leafy plant motif, begin by drawing an ascending, wavy line.


Next, draw two little loops down the bottom of the wavy line. Draw each loop opposite each other, with the wavy line down the middle, separating them.


Keep drawing the pairs of little loops, ascending the wavy line...


... until there is no more wavy line and the top reached.


Now to assemble the toppers...
Carefully place glue on the back of two matching circles. Place the toothpick/pop stick in the middle of one of the gluey circles and place the other gluey circle on top, ensuring the motifs are facing up the right way. 
With your finger, rub the edge of the toothpick, pushing the paper gently against the edge of the toothpick to ensure that it is firmly in place and not wobbly. Allow to dry.

NOTE: As the bottom part of the topper will be poked into the food, try to keep it clear of glue and gluey fingers.


Finished! Something fairly quick and easy to make to add a special, persoanl touch to party food (with the bonus of being inexpensive).

Have fun creating!
~ Jen.

P.S - To see more craft tutorials, visit our Pinterest folder. Click here to see what is pinned.

Saturday, 2 May 2015

Lemon yellow and Aqua blue tiny mixed media canvas

Last Christmas, I decided to treat myself. As I was buying little gifts to fill Christmas stockings, I found these tiny canvases in a shop. I thought that I would buy one and I would figure out what I would create later on. Well, I am glad that I made that purchase as this is the result and it is my favourite canvas to date...


I managed to add splashes of lemon yellow and aqua blue over the tiny canvas. The canvas is just big enough to place a daisy-like flower on the top, painted on a a book page and outlined/detailed with pen. With the combination of yellow and blue and the brightness that it creates, there couldn't be anything but happiness... hence the word 'Happiness'.

The great part about this canvas is that it comes with its own little easel, therefore it can be easily placed on a shelf, desktop, window sill, coffee table, etc. There are a few lovely ladies in my life that a tiny canvas like this would make the perfect gift.

I must admit, there are more of these little canvases on the studio table... I couldn't resist!

This item is currently in store. To view it, please click here.

~ Jen