Want to stay in touch? Become a 'Golden Ticket Member' (for FREE) for exclusive discounts + sales + freebies + news. Yes, please!

Monday, 8 July 2013

Monday in the making

It has been another crochet type of week...

...it is interesting how I am more motivated by particular crafts during certain weeks. This past week has been wet and cold and as my time with the children at work has drawn to a close for a little while, I have been exhausted. My body has shut down a little and all I want to do is rest in my comfy chair by the fire. However, I am not one to sit and do nothing... I picked up my crochet. 

Last week I showed a photo of a hat that I made for myself. Well, over the weekend, I added more ideas to the already altered mooglyblog.com pattern to create this gorgeous hat for a young child...


This beanie is designed for a young child (my foam ball model is a little too small for this beanie). I have added a pompom on the back and ear flaps with plaited cord. I love how these three colours work together - red, white and blue. Best of all, this beanie uses reclaimed yarn (yarn no longer wanted by knitters/crocheters), re purposing at its best.

On my list:
  • crochet projects
  • a new design
  • bibs
  • goodies for an upcoming market
Thanks for looking!

Saturday, 6 July 2013

A find...


I can't help it... I love shopping! Not necessarily buying a whole heap of things, but rather browsing and looking at all the goodies. I must admit, I love looking at my local Op Shop. They have got to be the best idea out - people are able to donate unwanted items, people are able to pick up unique treasures, reusing items (helps the environment) and the profits got to charity...win/win in my books.

I like to pick up a number of goodies for my crafting, but I do spot items (at bargain prices) for me. I walked by this dress a number of times, each time looking carefully at this item and running it through my hands. I am a colour combination lover (perhaps why I am drawn to fabrics and yarns) and I couldn't help but love the deep purple colour with a gold net pattern and sash. As you can see the rest is history...

Wednesday, 3 July 2013

Wonderful Wednesday - Up in the air

It has been a mixture of emotions this week...

...Mr T flew out earlier this week, travelling overseas. He is helping out with a program that helps to build houses for those that are less fortunate. I have had to cope with the feeling of only 'half existing' and a little 'left behind' as we have only travelled overseas together. However, I know that he is helping others and making a life changing difference. I am very proud of his efforts. He will also see and experience a new country and a new culture.

I do have some plans to spoil myself and get stuck into some crafty projects here on the home front. I am also having some family visit me shortly which will also be wonderful. Hence my inspiration for the week are... planes!

Aeroplanes frame by 'Little Flutter Creations'

How very clever! This art piece has been created using paper and then framed. I love the three dimensional look and formation. Would look great in a boy's nursery.

Personalised blocks by 'Retro Ragamuffins'

These blocks would look lovely in a child's room. I like the detailed, looping bunting that is evident on both blocks and the cute, little planes. A lovely memento!

Personalised cushion by 'Bubble & Squeak'

What a cute cushion! I love the beautiful bright colours and the lovely, plane, patterned fabric. I love the band across the middle that highlights the name. Gorgeous!

I hope that this provides you with some inspiration!

Monday, 1 July 2013

Monday in the making

When the weather is gloomy and cold, all I want to do is sit by the fire and crochet. I also can't wait for some holidays to reinvigorate and rejuvenate the body and mind and have some more time for some longer projects. However, I did manage to finish one project over the weekend...

... I finished making my slouchie beanie, using a variety of bright colours and textured yarn. I wanted to create something bright, unique looking and I am very happy with the result. I must say, that this design is based on a design by 'Moogly' - a fantastic crochet blog. You can check out the original pattern here. I want to create more using different colour combinations and reclaimed yarn. My only problem was that I didn't have enought fluffy, feathery pink yarn to croched one more round near the brim band...

On the list:
  • my crochet project (it is slowly getting there)
  • a scrapbooking gift
  • paper/card items
Thanks for viewing!

Friday, 28 June 2013

Friday Thoughts - Treasure Bag Card

A special, little friend of mine has just turned two. I thought that I would make her a unique and glittery card to go with her present. You can make one as well, and don't just limit yourself to the number two. You could have any number that you like on the front or use a simple shape outline (eg. heart or star).

What you need: card, pencil, tracing paper (or baking paper), scissors/cutter, paper for insert, small snaplock bag, various 'treasures' (sequins, paper punchies, glitter), sticky tape, eraser.

Measure out, cut and fold the card to the desired size.

Find a desired image. I used a computer to generate my number. Just ensure that the image will fit on the front of the card. Also ensure that the snaplock bag is bigger than the image.

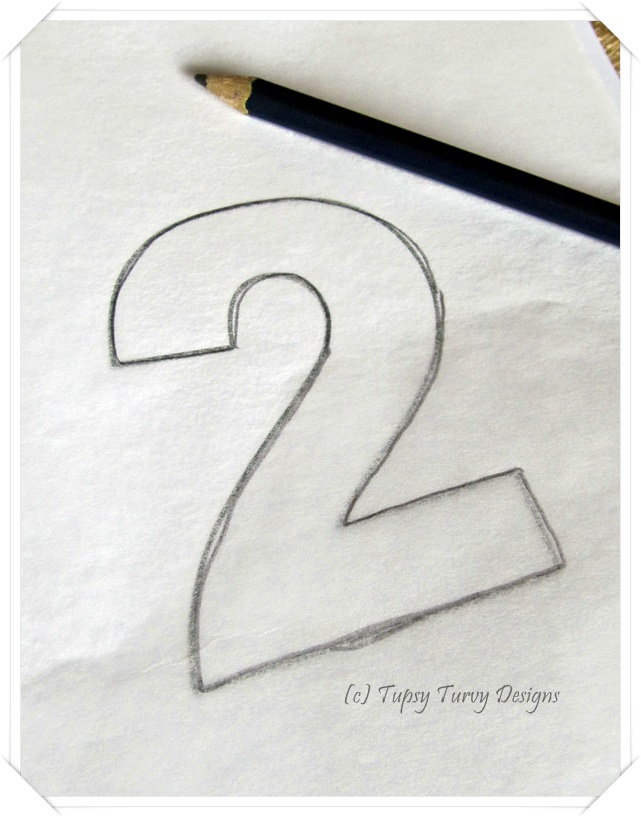
Using the tracing paper and pencil, trace the image. I simply use baking paper - it is handy (I usually have a stash in the pantry) and it is just as effective.

To transfer the traced image onto the card, flip it over (right side facing down) and scribble over the lines with the pencil. Flip over again (right way facing up), place onto the front of the card and trace over the lines of the image.

This is what my image looked like.


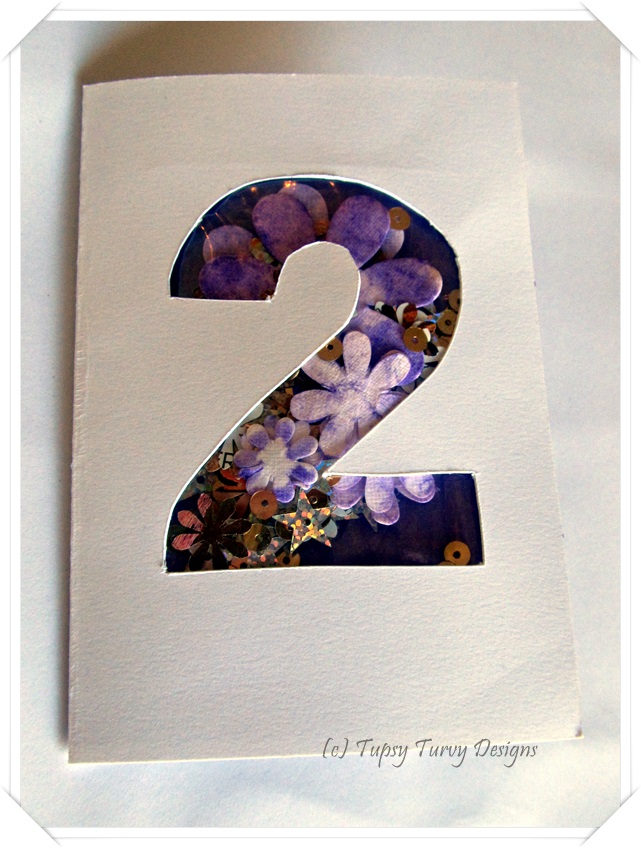
Using scissors or cutting tool, carefully cut along the lines of the image. With an eraser, rub out any remaining pencil marks.


Fill the snaplock bag with a variety of 'treasures', making sure that the bag is not too full. Seal the bag.

Tape the bag to the inside of the card - over the hole left by the cut out image. Tape along all the edges.

Make an insert with the paper to be placed in the card. Choose a colour that is evident in your 'treasures' (I chose purple). Not only will it cover the bag on the inside of the card, but I personally think that an insert finishes off a card. Simply fold the paper and trim it a few millimetres smaller than the card. I also use scissors that have a fancy edge/style to cut the side of the insert (see photo for reference). The trick with inserts is to adhere one side only, not both, to the card, otherwise the insert bulges when closed. Hence, place adhesive only on the side that will cover the taped bag (using the photo as a reference, I placed adhesive on the side that can be seen in the above photo). Place the fold of the insert into the fold of the inside of the card (as per the photo) and carefully close the card to adhere the insert to the inside of the card.

The finished card...

Have a wonderful weekend!

Wednesday, 26 June 2013

Wonderful Wednesday - True Colours

It is a big night here... it is 'State of Origin' night! This concept is a little foreign to most people in Southern Australia (where we live), however, Mr T grew up in Queensland and spent some time in New South Wales, therefore Rugby... and 'State of Origin' is a passion. For those who do not know of the concept, two states (Queensland vs New South Wales) vie for supremacy in Rugby. It has taken me a little while, but I am slowly beginning to understand the game, hence my inspiration for the week ... all things 'Maroon' (Go Queensland!)...

Glass tile pendant by 'Crafty Expression'

I love the variety of hues of maroon in this pendant and the contrast with the black leather cord. A perfect gift for someone special or simply keep it yourself to match a special outfit.

Grey felt koala brooch by 'Smashing Smile Designs'

How could I go past this little guy? A cute, felt koala sporting a maroon shirt. He would add interest to any shirt, scarf or hat. It would make a great gift for a 'maroons' fan!


Maroon bow-tie neck scarf by 'The Smile Emporium'

I love the style of this little scarf - it looks like it has been tied together. Just big enough to keep a neck warm on chilly nights. A great idea for winter!

I hope that this provides you with some inspiration!

Monday, 24 June 2013

Monday in the making

It has been another hair accessory week for me. I have been playing around with a different flower design and have come up with this...


A rosy pink one and a sea green one...


These clips are made from up-cycled t-shirts using different shades of the same colour. Stitched together on a felt backing. View these items in my madeit.com.au store here.

On the list:
  • card and pressie
  • bibs
  • a new toy design
  • crochet projects
Thanks for viewing!