

What you need: card, pencil, tracing paper (or baking paper), scissors/cutter, paper for insert, small snaplock bag, various 'treasures' (sequins, paper punchies, glitter), sticky tape, eraser.

Measure out, cut and fold the card to the desired size.

Find a desired image. I used a computer to generate my number. Just ensure that the image will fit on the front of the card. Also ensure that the snaplock bag is bigger than the image.

Using the tracing paper and pencil, trace the image. I simply use baking paper - it is handy (I usually have a stash in the pantry) and it is just as effective.

To transfer the traced image onto the card, flip it over (right side facing down) and scribble over the lines with the pencil. Flip over again (right way facing up), place onto the front of the card and trace over the lines of the image.

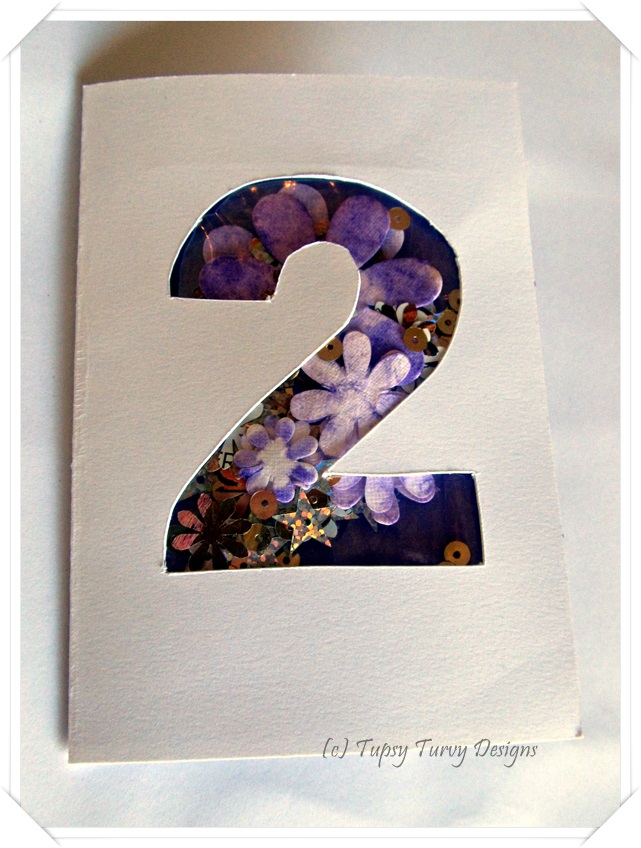
This is what my image looked like.

Using scissors or cutting tool, carefully cut along the lines of the image. With an eraser, rub out any remaining pencil marks.

Fill the snaplock bag with a variety of 'treasures', making sure that the bag is not too full. Seal the bag.

Tape the bag to the inside of the card - over the hole left by the cut out image. Tape along all the edges.

Make an insert with the paper to be placed in the card. Choose a colour that is evident in your 'treasures' (I chose purple). Not only will it cover the bag on the inside of the card, but I personally think that an insert finishes off a card. Simply fold the paper and trim it a few millimetres smaller than the card. I also use scissors that have a fancy edge/style to cut the side of the insert (see photo for reference). The trick with inserts is to adhere one side only, not both, to the card, otherwise the insert bulges when closed. Hence, place adhesive only on the side that will cover the taped bag (using the photo as a reference, I placed adhesive on the side that can be seen in the above photo). Place the fold of the insert into the fold of the inside of the card (as per the photo) and carefully close the card to adhere the insert to the inside of the card.
The finished card...
Have a wonderful weekend!
No comments:
Post a Comment
Thanks for viewing my blog! Please leave a comment...I would love to hear from you. I read and respond to comments made. Thanks again!